Smarthome | Jan 18, 2021
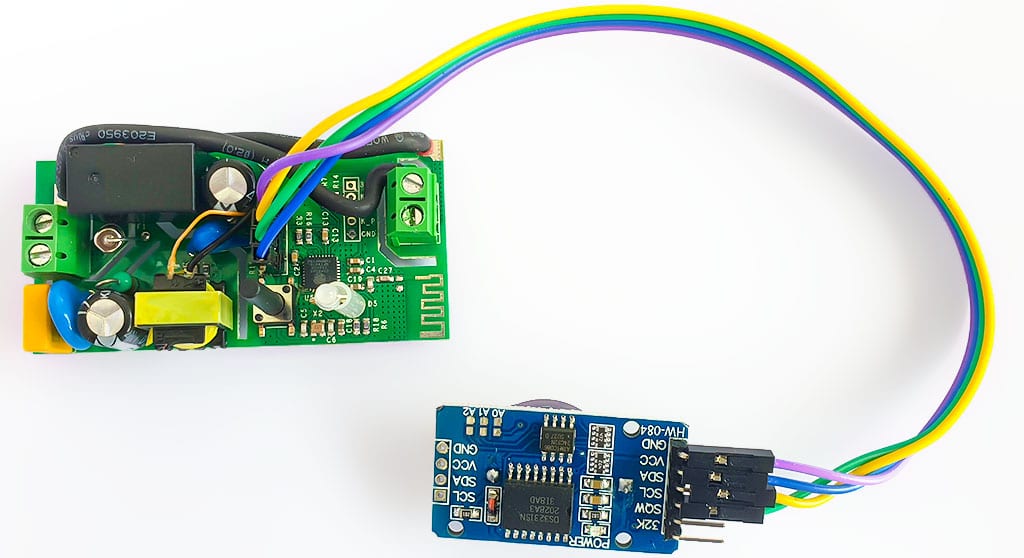
ESP8266 as we know does not include a RTC (real time clock). Therefore, the time synchronization should always happen from the internet NTP servers every time it boots or restarts. DS3231 is a cheap, one of the most accurate RTC devices that will work with 3.3V and is also compatible with Tasmota.
Did you ever think that you can use Tasmota timers without internet or Wi-Fi?
If your Wi-Fi connection is bad, not reliable or if you do not have any Wi-Fi at all then every time your Tasmota device boots or restarts, it loses the time keeping. As a result, the timers will stop from working or they will work at unexpected times out of the schedule. With a RTC device you can make a timed A/C circuit to turn on and off at specified times, or at sunrise/sunset without a Wi-Fi connection at all.
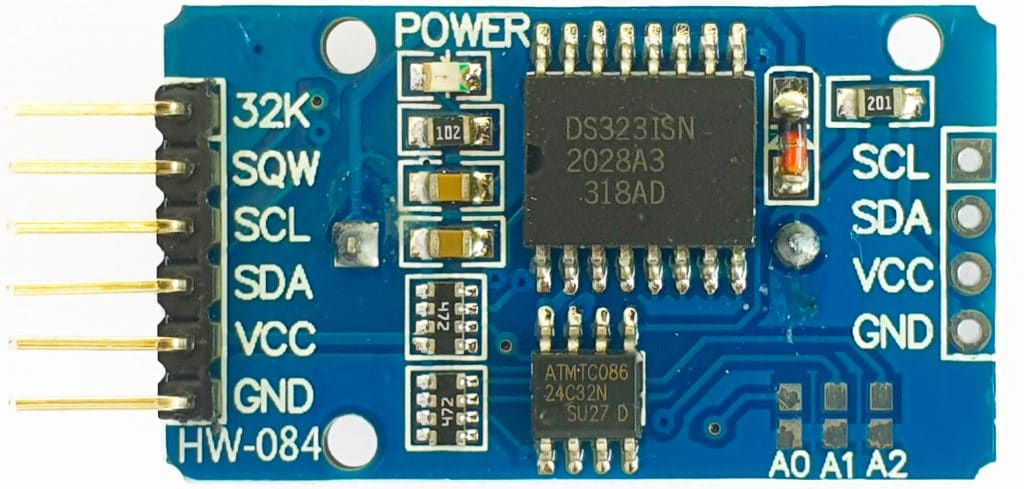
DS323 is a Real Time Clock that can work on both 3.3V and 5V and it includes a 3V coin battery to keep timing even when the power is out in the main circuit. Therefore, when Tasmota boots or restarts, DS3231 sets the correct time to Tasmota from its internal time keeping circuit. Whenever Tasmota has access to internet, it will update the time in DS3231 too to keep it synced with UTC. DS3231 comes with an internal Temperature Compensated Crystal Oscillator (TCXO). As a result it is very accurate and can still keep time without any deviation for different room temperatures.
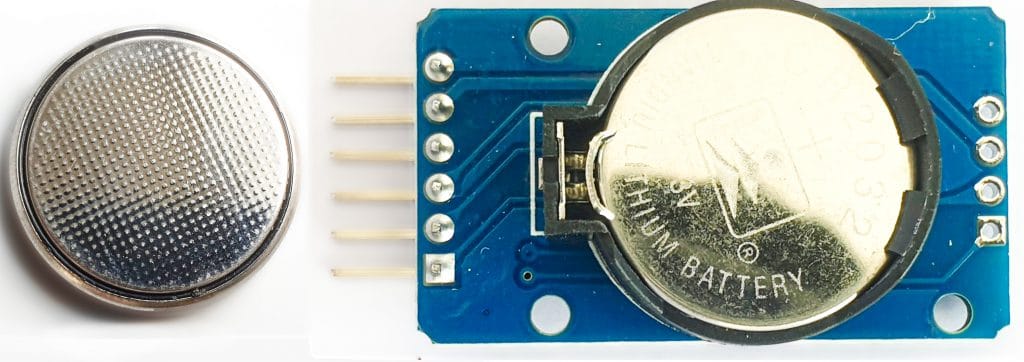
DS3231 can be powered by a cheap CR2031 coin battery to keep the time when the power is out. But the issue is it is designed for a rechargeable battery (such as LIR2032) and there is a direct power line to battery when the power is not out from DS3231 which in fact is a bad design. When 3.3V is supplied to DS3231, the power supply to battery will be around 2.7V which is definitely not enough to recharge the battery and since battery has 3V, definitely this there is not going to be any current in the charging circuit towards the battery. But as time goes and when CR2032 battery starts to discharge if at any point if it reaches less than 2.7V in its cell, the recharging circuit will start to work and the battery will start to heat and may explode. Therefore, for long-term use and safety, please disconnect this charging circuit on device before begin.
Using LIR2032 re-chargeable battery instead is not necessary and will not help at all when only 3.3V is supplied to DS3231 and if a Sonoff device is used for the purpose, it has a very limited power supply. In this case to keep the current at the lowest we need to make sure that DS3231 runs with a minimum current. Therefore, battery re-charging is not important here. CR2032 can still run the RTC circuit for many years without replacing for a new battery.
First, disconnect the battery re-charge line. Marked resister can be removed with a soldering iron to accomplish this easily.
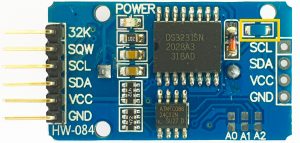
This step should not be avoided for any reason when using the circuit for production long term use.
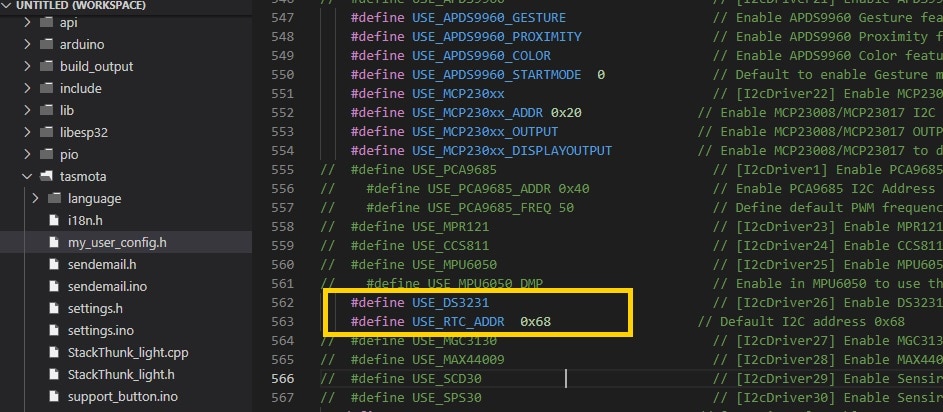
Pre-compiled Tasmota files unfortunately do not include DS3231 support by default. Therefore, to make Tasmota with with RTC, it should be complied on your own by making below changes to my_user_config.h
in my_user_config.h change,
// #define USE_DS3231
// #define USE_RTC_ADDR  0x68
to
#define USE_DS3231
#define USE_RTC_ADDR  0x68
Uncommenting the two lines ad above will add support for DS3231 RTC on your Tasmota build. Now, compile it.
If you have difficulty is compiling Tasmota on your own, you can download the pre-complied Tasmota with support for DS3231 file here.
Download Tasmota 9 with DS3231 support pre-complied below.
Download: tasmota_ds3231.bin
Flash the ESP8266 device with the complied or downloaded firmware. If you do not have a FTDI converter for flashing you can also use an Arduino UNO board for the purpose. How to flash Sonoff devices using Arduino UNO?
You can flash NodeMCU, Wemos D1 Mini or even Sonoff with this firmware. For this guide we will use Sonoff Basic.

Connect 3V3 on Sonoff to VCC on DS3231 and GND to GND pins on both boards. For SDA and SCL on DS3231, RX and TX pins on Sonoff can be used.
To use RX and TX on Sonoff pins for this purpose, first it is necessary to disable Serial Logging on Tasmota.
Connect RX on Sonoff to SCL on DS3231.
Connect TX on Sonoff to SDA on DS3231.
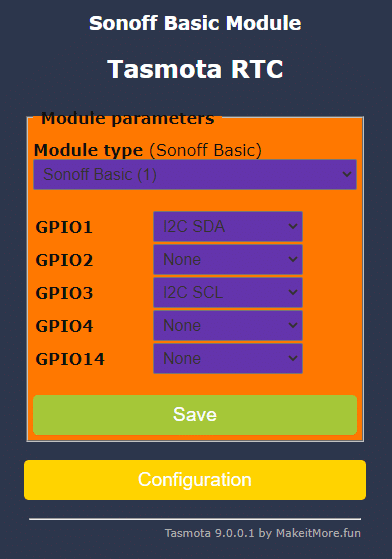
Make GPIO1 – SDA and GPIO3 the SCL.
Connect the wires and restart Tasmota and check the console.
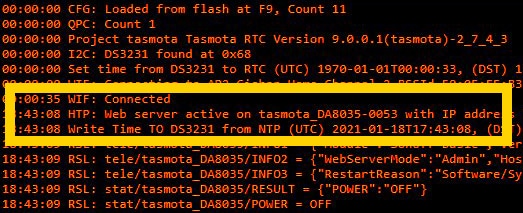
When booting Tasmota with DS3231 for the first time, it should write the current time from ESP8266 to DS3231. Tasmota will do this time to time when an internet connection is available.
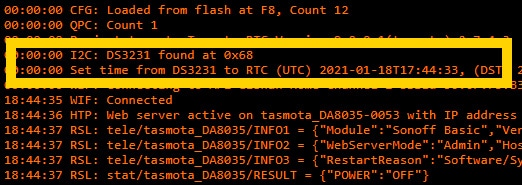
When restarting, Tasmota should get the time from DS3231 as seen in the console.
If your board is not getting any internet or Wi-Fi at all, change the WifiConfig to mode 5 to prevent restarting. Type below in Tasmota console and press enter.
WifiConfig 5Tasmota needs internet at least one time after the wiring to sync the correct UTC time to DS3231 RTC (perhaps a hotspot can be used, if Wi-Fi is not available). Tasmota only uses UTC from DS3231 and therefore, any time zone changes in Tasmota later does not affect the time keeping.
Yes, set the correct latitude, longitude and time zone using LATITUDE, LONGITUDE and TIMEZONE Tasmota commands to use timers with Sunrise and Sunset. Tasmota can calculate correct sunrise and sunset when correct Latitude and Longitude are set without internet.
Hello I found your post on the RTC at Tasmota. I built a version with Tasmota 11.1. Unfortunately I don’t get any set or write feedback although the DS3231 is found.
Do you have a tip for troubleshooting?
Tasmota 11.1.0 DE
#define USE_RTC_CHIPS // Enable RTC chip support and NTP server – Select only one
#define USE_DS3231 // [I2cDriver26] Enable DS3231 RTC (I2C address 0x68) (+1k2 code)
Bootlog:
00:00:00.001 HDW: ESP8266EX
00:00:00.051 CFG: aus Flash geladen von FB, Anzahl 25
00:00:00.062 I2C: DS3231 gefunden bei 0x68
20:36:35.009 Projekt tasmota – M3 Version 11.1.0(tasmota)-2_7_4_9(2022.06.03 11:13:17)
20:36:35.018 I2C: BMP280 gefunden bei 0x77
20:36:35.060 I2C: AHT2X gefunden bei 0x38
20:36:39.469 WIF: verbinden mit AP1 FritzBoxFonWLAN Channel 6 BSSId CC:CE:1E:F4:D9:A6 in Modus 11n als tasmota-CF1C9E-7326…
20:36:41.487 WIF: verbunden
20:36:42.209 HTP: Web-Server aktiv bei tasmota-CF1C9E-7326 mit IP-Adresse 192.168.178.45
20:36:42.212 RSL: INFO1 = {“Info1”:{“Module”:”M3_03-06-2022_1235″,”Version”:”11.1.0(tasmota)”,”FallbackTopic”:”cmnd/DVES_CF1C9E_fb/”,”GroupTopic”:”cmnd/tasmotas/”}}
20:36:42.222 RSL: INFO2 = {“Info2”:{“WebServerMode”:”Admin”,”Hostname”:”tasmota-CF1C9E-7326″,”IPAddress”:”192.168.178.45″}}
20:36:42.233 RSL: INFO3 = {“Info3”:{“RestartReason”:”Software/System restart”,”BootCount”:21}}
Grüße Ludwig
Here is a short info. I deleted all NTP servers and connected/disconnected the RTC with powerless reboot. The RTC works correctly. The Tasmota documentation is no longer correct – information about Write is not given to me.
Ludwig
tried the bin already compiled and ok but I wanted to ask can I use it for deep sleep?